Community
Share your experience!
Turn on suggestions
Auto-suggest helps you quickly narrow down your search results by suggesting possible matches as you type.
Showing results for
- Community
- TV & Home Cinema
- How Tos & FAQs
- Our definitive guide to the perfect TV picture set...
Our definitive guide to the perfect TV picture settings
profile.country.DE.title

July 2015
- Subscribe to RSS Feed
- Mark as New
- Mark as Read
- Bookmark
- Subscribe
- Printer Friendly Page
- Report Inappropriate Content
July 2015
The idea of the perfect television picture will undoubtedly vary from person to person – it’s just a matter of personal taste. Having said that, it’s easy to improve the colour, contrast and clarity of any TV display – all it takes is a few small tweaks to the settings in the background. Here’s how to get started:
Preparation
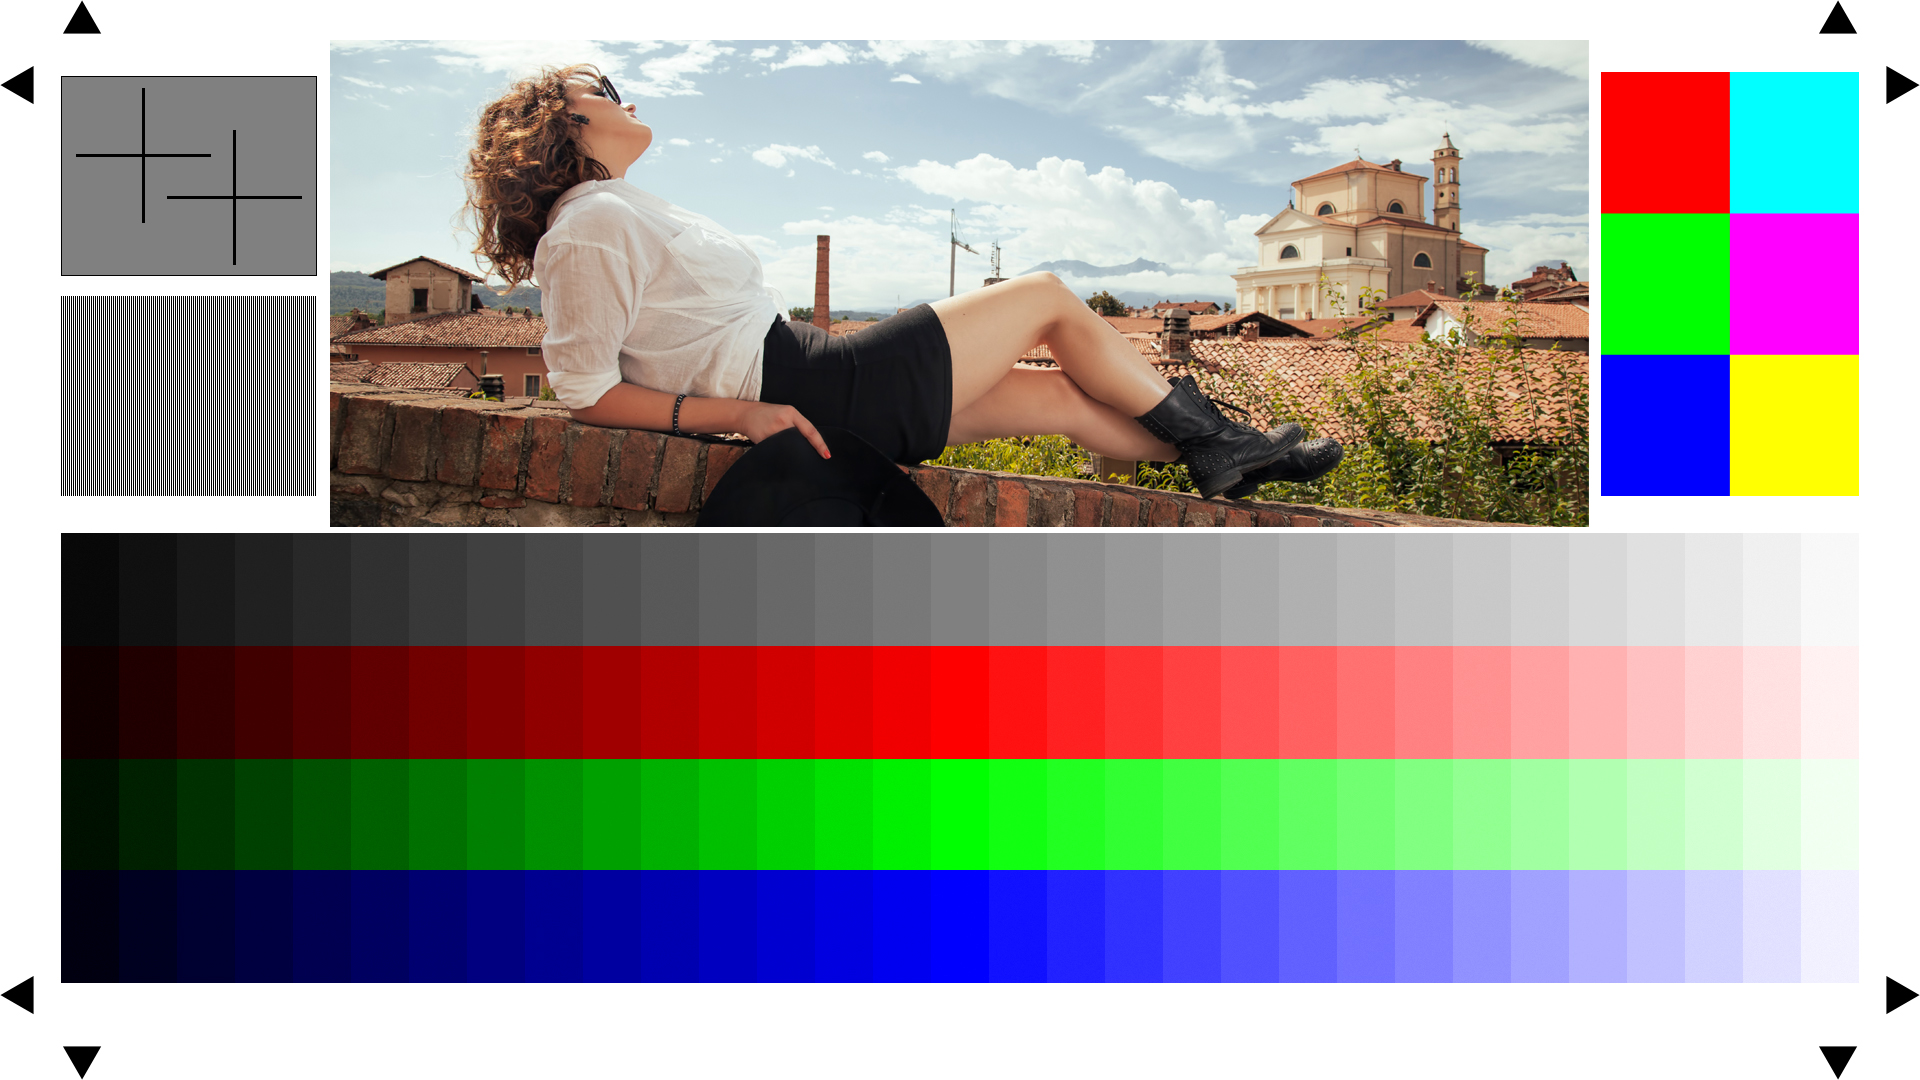
Before we get going, download the test chart that’s attached to this page and save it on a USB stick. Plug the USB stick into your TV and open the image using the media player so that the chart is on-screen. For our latest Android TVs please playback the file via DVD or Blu-ray player since you cannot change picture settings using the Album app.
It’s always best to begin by adjusting the basic settings, but to do that accurately we need to turn off some of the advanced features. From the TV home screen, go to ‘Settings’ > ‘System Settings’ > ‘Eco’ and switch off the Light Sensor. Then go to ‘Settings’ > ‘Picture’ and turn off ‘Reality Creation’, ‘Smooth Gradation’ and all of the ‘Noise Reduction’ features.
We’d recommend keeping the ‘Backlight’ setting at around seven or eight and setting the picture mode to ‘Standard’. Once adjusted, click on ‘Advanced’ and turn everything off.
Note: Be sure to only access the picture settings from the TV home screen by pressing the ‘Home’ button on your remote control. If you access from the ‘Options’ button, you will only be adjusting the settings for one source instead of the whole television. Also, make sure that the target inputs are set to ‘Common’.
Calibrating your TV
Firstly, we need to check for the correct picture size. In general, TVs will enlarge the provided signal slightly which results in a picture that’s not as sharp as it could be - you might be able to notice this by looking at the resolution stripes which show a kind of moiré effect. To see the true picture size, go to ‘Settings’ > ‘Display’ > ‘Screen’, then set auto display area to ‘Off’ and display area to “Full Pixel”. Now you should see the full arrows in each corner and the moiré in the resolution field should have disappeared.

Adjusting brightness

Adjusting contrast

Adjusting sharpness

Adjusting Colour Saturation
Adjust the colour saturation to a level that allows you to notice a difference between all the color gradations on the test chart. Be sure to pay particular attention to the centre part of the colour scale and the image in the middle of the test chart to ensure that skin tones look natural.

Additional settings
Now that all of the basic settings on the TV have been optimized, you should already be able to notice the difference it makes. But before you put down that remote control, it’s worth going back to the advanced settings and turning on the ones that will provide that extra bit of detail. Our recommendations are:
- ‘Reality Creation’ > ‘On’. This will enhance the quality of your images by restoring lost details.
- ‘Smooth Gradation’ > ‘Medium’. This further improves color gradations of all sources and is very efficient on highly compressed signals. You will notice the difference in the various gradations of a blue sky for example.
- If you only use digital sources, we recommend keeping all noise reduction settings switched off.
All other settings - including colour temperature and black corrector in the advanced settings - can be adjusted to your own personal taste. Take some time to experiment with each of them and see what you think.
Optimizing settings for various sources
One of the easiest ways to quickly improve overall picture quality is to select the scene that matches your content source. For example, if you’ve connected a PlayStation 4 into one of the HDMI ports, you should select ‘Game’ from the scene selection menu, or if you’ve connected a PC then you should go for ‘Graphics’. From here you can fine-tune the settings to your own preference – just be sure to adjust by using the ‘Options’ button on your remote so that it only applies to that particular source.
Now that all of the picture settings are optimized on your TV you should see a real improvement – even if you thought your picture looked great to begin with! All that’s left to do now is sit back, relax and enjoy the best quality picture possible.
You must be a registered user to add a comment here. If you've already registered, please log in. If you haven't registered yet, please register and log in.
12 Comments

0online
1898364posts